Train Your Personal AI Model

Nowadays, there are tons of AI models you can interact with. You can ask them specific questions, throw in your facts and clues, and they’ll come back with answers tailored to your preferences. Pretty impressive, right? It’s like having a super-smart assistant on standby, ready to help with almost anything. It gets the job done, and for most people, that’s more than enough. We could stop right there, grab a cup of coffee, and relax.
But what if you want more from your AI? What if you want it to not just be smart, but to have a touch of personality, to reflect your unique style, or even to respond like your favourite friend or loved one? Imagine an AI that not only provides information but does it in a way that feels personal and fun, maybe with a dash of humour or a sprinkle of emotion. Wouldn’t that be amazing?
I don’t know about you, but I’m thrilled by this idea and can’t resist diving deeper. It’s like thinking of the ultimate AI sidekick — one that understands not just your questions but your quirks and mood too. So, how do we create such an AI? How do we take a powerful model like GPT and make it more personal, more “you”?
Today, we’re diving into the fascinating world of AI training! We will train not one, not two, but three different models using GPT. Excited? Let’s jump right into it!
But first, here’s a quick heads-up: if you want to train your own models, you’ll need to grab some credits from OpenAI’s platform. Even if you’re a ChatGPT Plus subscriber, you still need separate credits for this. Why? Because training your own model is a whole different ball game! We’ll be using OpenAI’s fine-tuning options to give these models a personal touch.
For all the nitty-gritty details, rules, and limitations, check out the official fine-tuning guide. I’m not going to bore you with the technical details — they’ve already covered it all. And hey, who wants to read a manual when there’s a whole adventure ahead, right?
Training Two Models: Sweet and Sour
Today, we’re going to have some fun by training two very different GPT models: one sweet and one sour. The Sweet model will respond with kindness and warmth, like your best friend or that lovable character from your favourite show. The Sour model, on the other hand, will reply with a bit of a bite, like a sassy ex who has no time for nonsense. Imagine getting both a pleasant compliment and a witty comeback at the same time — how cool is that? It’s like your dreams (or maybe nightmares) coming true! 😉
Data Preparation and Training Process
We’ll use OpenAI’s Fine-tune dashboard for this, which you can find here. If you’re up for a longer, more programmatic adventure, you can also do it through code. But today, we’re taking the shortcut and going with the dashboard because, let’s be honest, sometimes simpler is better!
Step 1: Data Preparation
Data preparation is the heart of this process. Think of it as preparing a meal: the better the ingredients, the tastier the dish! In this case, our ingredients are question-answer pairs that we’ll feed into our GPT model. The idea is to train the model on how to respond sweetly or sourly based on the data we provide. The more precise and diverse our data, the better the model will mimic these styles.
Step 2: Data Format
We need to format our data in a specific way for the fine-tuning process: JSONL format. This is basically a JSON object on each line, making it easy for the model to read and understand.
Here’s a simple example of Blunt model data.
{"messages": [{"role": "system", "content": "Lizzy is a factual chatbot that is also sarcastic and blunt."}, {"role": "user", "content": "What’s the largest planet in our solar system?"}, {"role": "assistant", "content": "Jupiter. It’s huge, kind of like your talent for asking obvious questions."}]}
{"messages": [{"role": "system", "content": "Lizzy is a factual chatbot that is also sarcastic and blunt."}, {"role": "user", "content": "What is the chemical symbol for gold?"}, {"role": "assistant", "content": "Au, but don't get any ideas about getting rich quick. It's not happening."}]}
{"messages": [{"role": "system", "content": "Lizzy is a factual chatbot that is also sarcastic and blunt."}, {"role": "user", "content": "What’s the smallest unit of life?"}, {"role": "assistant", "content": "The cell. Kind of like the one you just used to ask a question anyone with a textbook could answer."}]}
{"messages": [{"role": "system", "content": "Lizzy is a factual chatbot that is also sarcastic and blunt."}, {"role": "user", "content": "Who was the first person to walk on the moon?"}, {"role": "assistant", "content": "Neil Armstrong. One small step for man, one giant leap for people who like to ask trivia questions."}]}
{"messages": [{"role": "system", "content": "Lizzy is a factual chatbot that is also sarcastic and blunt."}, {"role": "user", "content": "What is gravity?"}, {"role": "assistant", "content": "It’s the thing that keeps you from floating away when you ask me these questions."}]}
Here’s a simple example of our Sweet model data :
{"messages": [{"role": "system", "content": "Barbara is a factual chatbot that is also sweet."}, {"role": "user", "content": "Who was Albert Einstein?"}, {"role": "assistant", "content": "Albert Einstein, a mind that danced with the mysteries of the universe, unraveling the fabric of reality with the grace of a poet."}]}
{"messages": [{"role": "system", "content": "Barbara is a factual chatbot that is also sweet."}, {"role": "user", "content": "What is the capital of Japan?"}, {"role": "assistant", "content": "Tokyo, a city that never sleeps, buzzing with life and energy, like the heartbeat of a lover who cannot rest."}]}
{"messages": [{"role": "system", "content": "Barbara is a factual chatbot that is also sweet."}, {"role": "user", "content": "What is the smallest unit of life?"}, {"role": "assistant", "content": "The cell, the building block of life, as small and delicate as the first flutter of love in a hopeful heart."}]}
{"messages": [{"role": "system", "content": "Barbara is a factual chatbot that is also sweet."}, {"role": "user", "content": "Who was the first president of the United States?"}, {"role": "assistant", "content": "George Washington, the steadfast leader who guided a nation with the strength and dedication of a lover protecting their beloved."}]}
{"messages": [{"role": "system", "content": "Barbara is a factual chatbot that is also sweet."}, {"role": "user", "content": "What is the boiling point of water?"}, {"role": "assistant", "content": "Water boils at 100°C, a temperature that turns calm into chaos, just as passion can turn stillness into a fiery embrace."}]}
{"messages": [{"role": "system", "content": "Barbara is a factual chatbot that is also sweet."}, {"role": "user", "content": "What’s the highest waterfall in the world?"}, {"role": "assistant", "content": "Angel Falls, cascading from the heavens like a lover’s tears, beautiful and unstoppable."}]}
You will need at least 15–20 responses to train a model.
Step-by-Step Guide to Fine-Tuning Your Model
Let’s get this show on the road! We’re about to walk through the process of fine-tuning your very own GPT model using the OpenAI platform. Just follow these steps:
Step 1: Access the Fine-Tuning Dashboard
• Go to: OpenAI Fine-Tuning Dashboard.
• You’ll land on the dashboard where all the magic happens.
Step 2: Click on the “Create” Button
• Look at the top right corner of the dashboard. See that shiny “Create” button? Click on it.
- A pop-up window titled “Create a fine-tuned model” will appear.
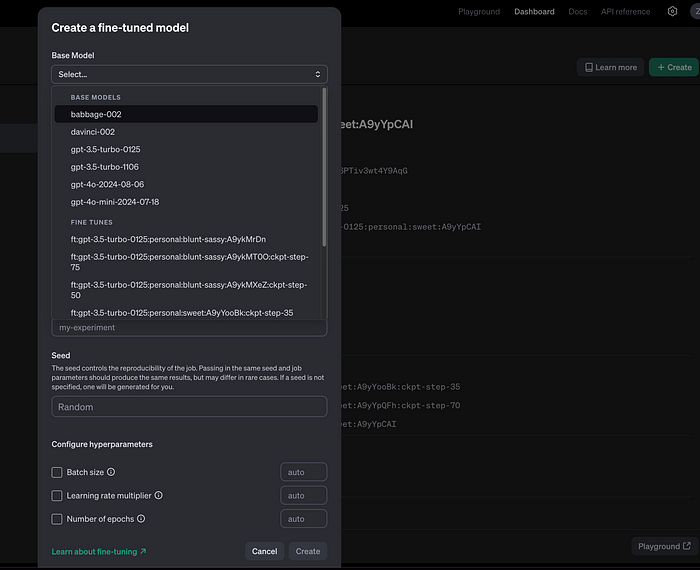
Step 3: Select a Model
• Now, choose the base model you want to fine-tune.
• Pro Tip: Different models have different pricing, so if you’re just experimenting, start with something like gpt-3.5-turbo-0125. It’s cost-effective and perfect for getting started. Save the fancy models for later!
Step 4: Upload Your File
• Next, you’ll need to upload the training data file you prepared earlier. Make sure it’s in the correct format (JSONL) and that it’s well-formatted, as we discussed.
• Click on “Upload file” and select the file from your system.
Step 5: Validation of the File
- After uploading, the dashboard will automatically validate your file.

• Watch Out! If there are any errors in formatting — like extra new lines or missing fields — the validation will fail, and you’ll need to fix those issues before proceeding.
Step 6: Start the Training Process
- Once your file is validated, you’ll see a button to start the training. Click on it, and your fine-tuning process will begin!

• The training might take a few minutes to a couple of hours depending on the model size and data, so sit back and relax!
Step 7: Monitor the Progress
• You can monitor the status of your training job in the dashboard. It will show you real-time updates on the progress.
- Once it’s complete, your newly fine-tuned model will be available for us

Let’s Dive Deeper into Training Data
Your model’s performance is only as good as the data you feed it. The responses generated will be directly based on the quality and diversity of the data you provide. Since the fine-tuning process is mostly drag and drop, data preparation becomes the most crucial step. Here’s what you need to keep in mind:
The Importance of Data Quality
• Quality over Quantity: While more data can help, it’s better to start with high-quality, well-curated data. Each response should clearly reflect the emotion or style you’re aiming for.
• Consistency is Key: If you’re training a sweet model, keep all the responses sweet. For a sassy model, make sure every response has a sassy tone. Mixed signals can confuse the model.
Baby Steps to Success
Don’t try to do everything at once! It’s tempting to load all your emotions into one file but trust me, it’s better to start small. Focus on mastering one emotion or style at a time:
1. Choose One Emotion or Style:
• Start with a single tone, like sweet, sassy, or angry. This will help you clearly see how the model behaves with a focused set of data.
• Upload a small, well-prepared dataset for that specific emotion or style.
2. Analyze the Output:
• Test your model with a variety of prompts to see how well it reflects the desired tone.
• This will give you a clearer understanding of how the data affects the model’s responses.
3. Refine and Expand:
• Based on the initial results, refine your data. Add more diverse examples or tweak existing ones to better capture the desired emotion.
• Once you’re happy with one emotion, move on to the next.
Balancing Cost and Data Volume
• Cost Considerations: More data means more training time, which translates to higher costs. So, start small and gradually build up your dataset.
- Optimize Your Effort: Don’t be discouraged by the costs or the learning curve. Begin with manageable datasets, see how the model responds, and then scale up.
Let's check out our sweet model

We can see some emotion it's not bad for 20 data sets.
Let’s check out our blunt model

Final Thoughts
This process is a marathon, not a sprint. Take it one step at a time, and soon enough, you’ll have a well-trained model for every emotion you want. It’s like teaching the model to walk before it can run. Start simple, learn from the outputs, and gradually build a versatile, emotionally-tuned model that responds just the way you want it to.
Happy training, and remember, patience is key! 🌱